Open topic with navigation
Connect to a server
XECUTE and XECUTE Config make use of connections profiles to establish connections to the XECUTE server. These profiles have the connection details to the EPF OMI server that manages the XECUTE service.
XECUTE applications can be installed from offline installers (*.exe or *.msix) or from the WebDeploy portal.
When installed using offline installers, the connection profile must be manually configured
When installed from the WebDeploy portal, the connection profile is automatically configured.
- To install via the web deployment page, browse to the XECUTE server name in your browser and click the Launch tile for the applications.
- The web deployment page has links to offline *.msix installers should these be needed. To obtain offline *.exe installers, contact RPM Support. Note that *.exe installers require administrative privileges to install.
- To configure the connection profile manually, see the Set up a new server connection section below.
Set up a new server connection
- In both XECUTE and XECUTE Config, click the Service Connection icon in the top right corner of the screen
 .
.
- A connection dialog and Environment selector will appear; select the connection icon
 to continue.
Note: The XECUTE Client connection window looks slightly different as it includes the Spatial Domain dropdown.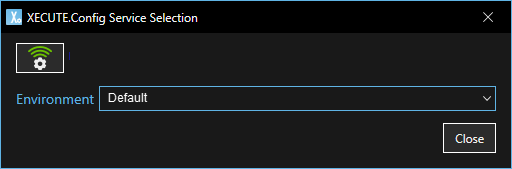
The Service Connection dialog displays.
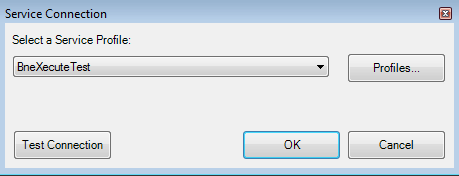
If you are using XECUTE for the first time, the dialog automatically displays when the product is launched.
- Click Profiles. The Add/Remove Service Profiles dialog displays.
- Click Add to create a new service profile.
- In the Profile Name field, specify a profile name. Each profile that you create must have a unique name.
- In the Address section, specify the connection details of the EPF OMI server to which you want to connect:
- Host Name: The name of the EPF OMI server as identified on the network. The XECUTE server selection is done later in the Environment dropdown.
- Port: The EPF OMI service port number.
- Protocol: Select regular protocol (HTTP) or secure protocol (HTTPS).
- If using HTTPS protocol, https must be configured on the server. See the EPF and XECUTE Administration Guides.
- In the Authentication section select the Authentication type.
- Windows as the Authentication type. Authentication can be performed using Windows Active Directory Services if the OMI Server and the Client are on the same domain or there is a trust between the Server and Client domain if they are on different domains.
- If Microsoft Entra ID is selected, the user will be authenticated using Microsoft Entra Domain Services and Single Sign On is supported. Note: Microsoft Entra Domain Services must be configured by your system administration beforehand and configured within EPF using RPM Integration Management Studio.
- If User Credentials (OAuth 2) is selected, a Login window displays when you make the connection. Enter your user name and user password. User Credentials (OAuth 2) can be used to login to XECUTE as another user. Note: The XECUTE license will be checked out using your domain name.
- If Client Certificate is selected, a signed certificate must exist in the user's certificate store. This option only displays when the protocol is set to HTTPS.
- If connecting to the server from outside the domain, either User Credentials (OAuth 2) or Client Certificates can be used for authentication.
- Username/Password (Basic) - Not supported.
- Timeout Overrides - Select the check box to activate the control and adjust the timeout in seconds when connecting to the EPF server. If a connection is not established within the timeout a connection error will be generated. The default timeout is 60 seconds.
- Click OK to continue.
- Click Close.
- Click Test Connection to check that you can successfully connect to the EPF server. If there are connection issues, go back and check the Address section in step 6.
- Click OK to finish creating a new server connection.
A grey service connection icon indicates there is no service connection active.
A green service connection icon  indicates the service is connected and active.
Edit a service connection
- Click Service Connection then click the connection icon in the dialog.
- Click Profiles. The Add/Remove Service Profile dialog displays.
- In the Service Profile List, select the service profile that you want to edit and then click Edit.
- Make the necessary changes and then click OK.
- Click Close and then OK to save the changes.
Switch to another service connection
- Click Service Connection then click the connection icon in the dialog.
- In the Select a Service Profile field, select a service connection from the drop-down menu and then click OK.
Licensing
Licensing is managed from the XECUTE server and should be configured by system administrators. Starting with version 2.6 of XECUTE, the Client License Manager application is no longer required for XECUTE applications.
XECUTE and XECUTE Config have separate connection profiles.
Environments
Each Connection Profile (EPF Server) can have one or more XECUTE servers (Environments) associated with it. When two or more XECUTE servers are registered, they appear in the Environment selector dropdown. Environments can be separate mine sites or project development phases; Dev, QA, Production and so on.
Test Connection
To run a series of network and permission tests open Test Connection from the XECUTE menu (icon in upper left of application window).
-
EPF Tests - Click button to test the connection to the EPF components of the EPF server configured in the Connection profile
-
XECUTE Environment - Set Environment to run the tests against
-
Data Source - Set the EPF Data Source to use in the permissions test
-
Run All Tests - Runs all network and permission tests or Run the individual tests
-
Copy - Copy test results to clipboard